ARACER RC1/RC2 SOFTWARE SETUP GUIDE - GROM / MONKEY
Software -
Apple - https://apps.apple.com/us/app/aracersmart/id1296085645
Android - https://play.google.com/store/apps/details?id=com.aracer.smartpro
Computer RC1 & RC2 Speed Tuning Super Software (Speed Tuning Super 2 for RC2)- http://www.aracer-speedtek.com/English/CloudDownLoad.aspx?typeId=0
aRacer Smart Setup Guide (Phone Application) -
Step 1 - Download the aRacer Smart application. There is both a free and paid version as I will go over the paid version first and add the “lite” version at a later time.
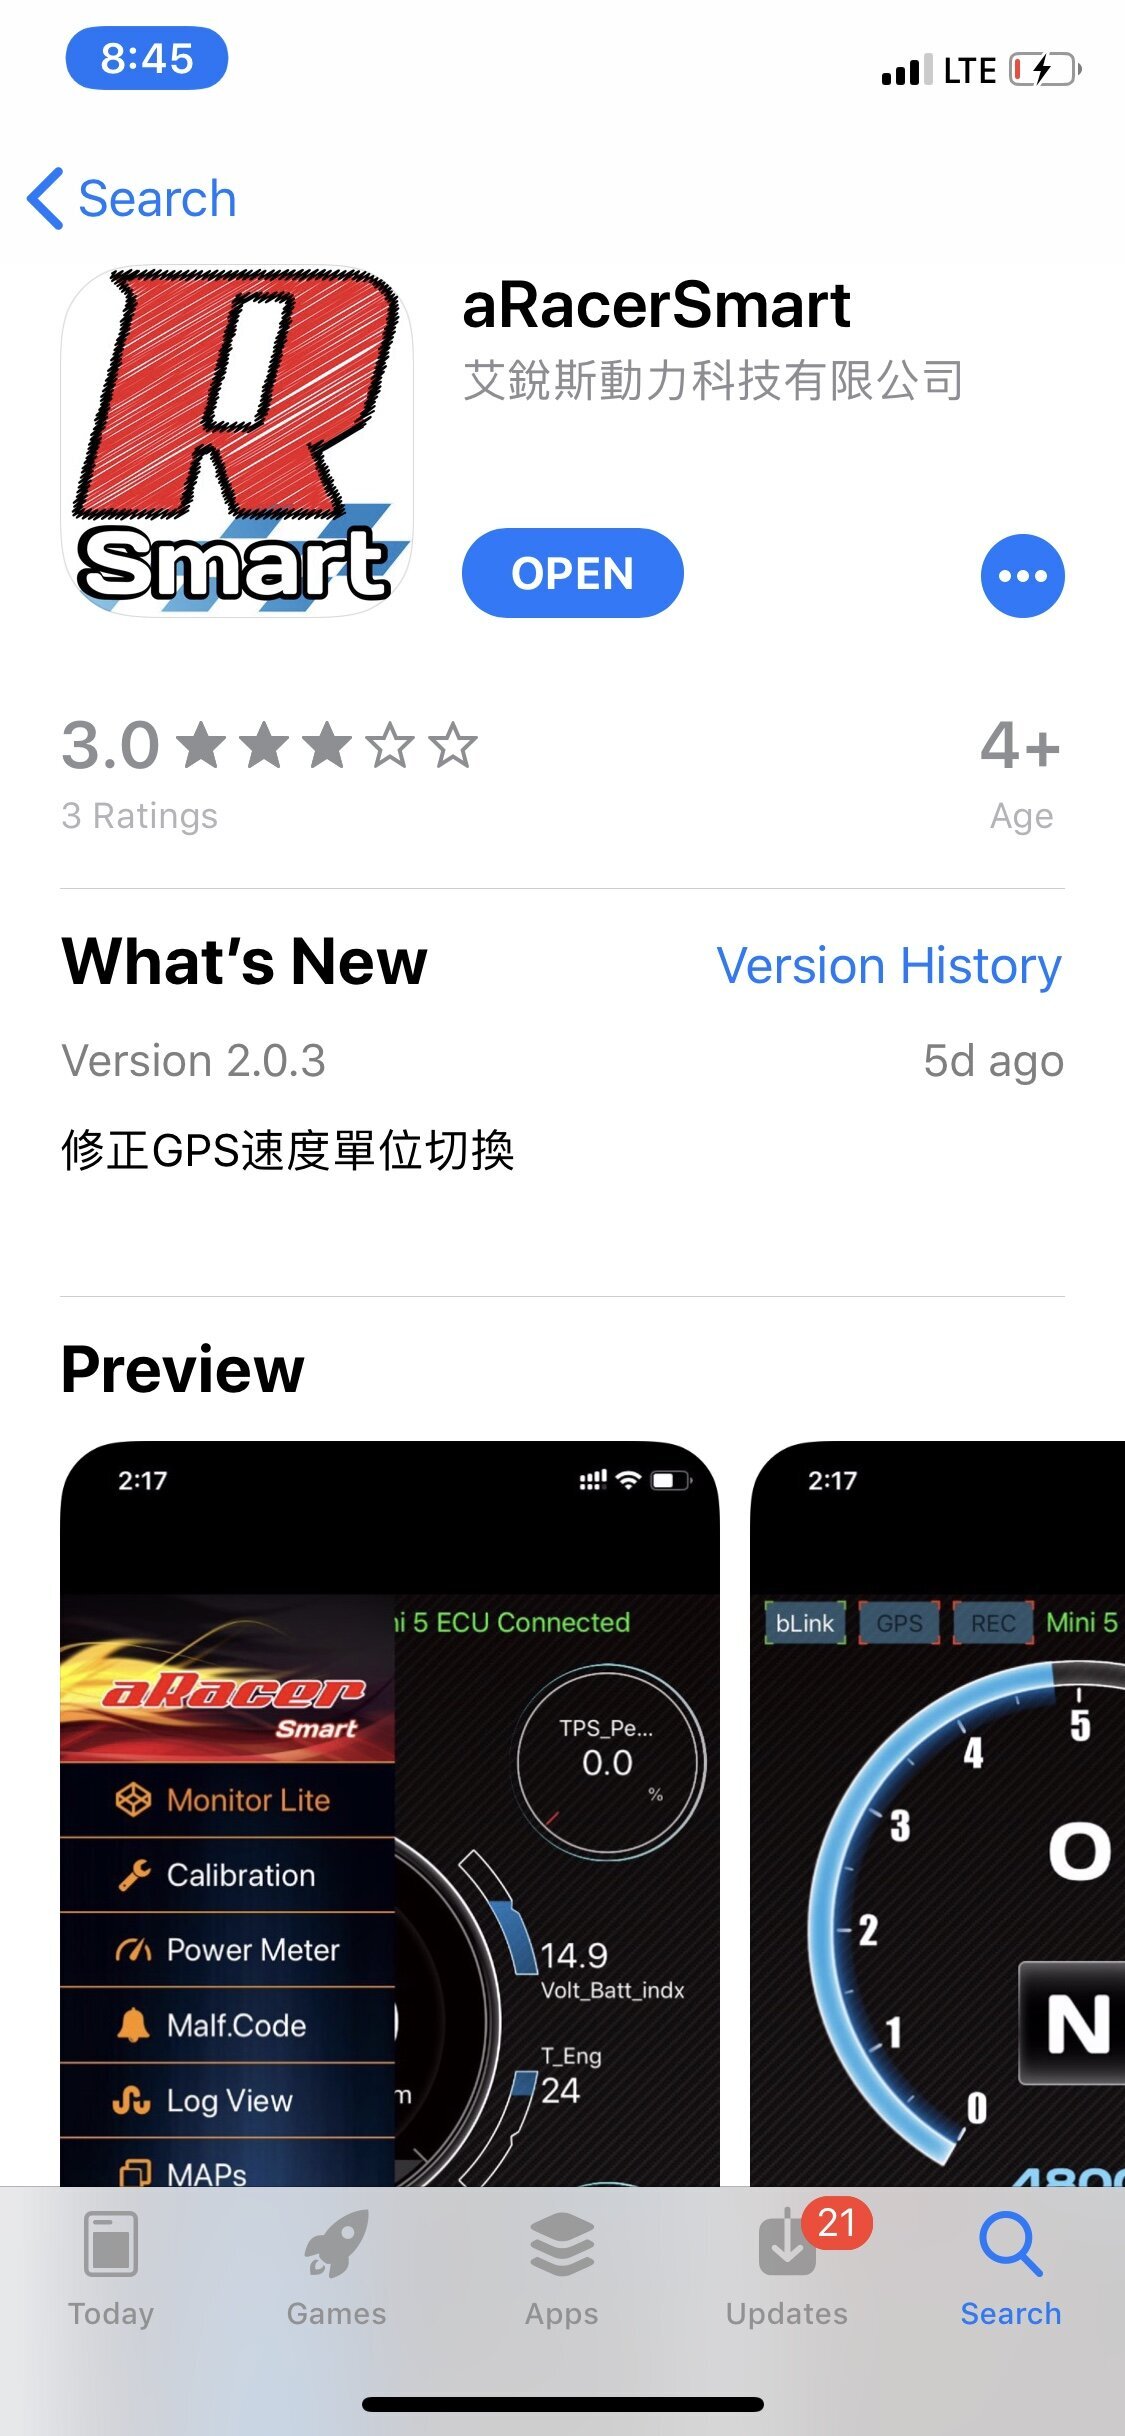
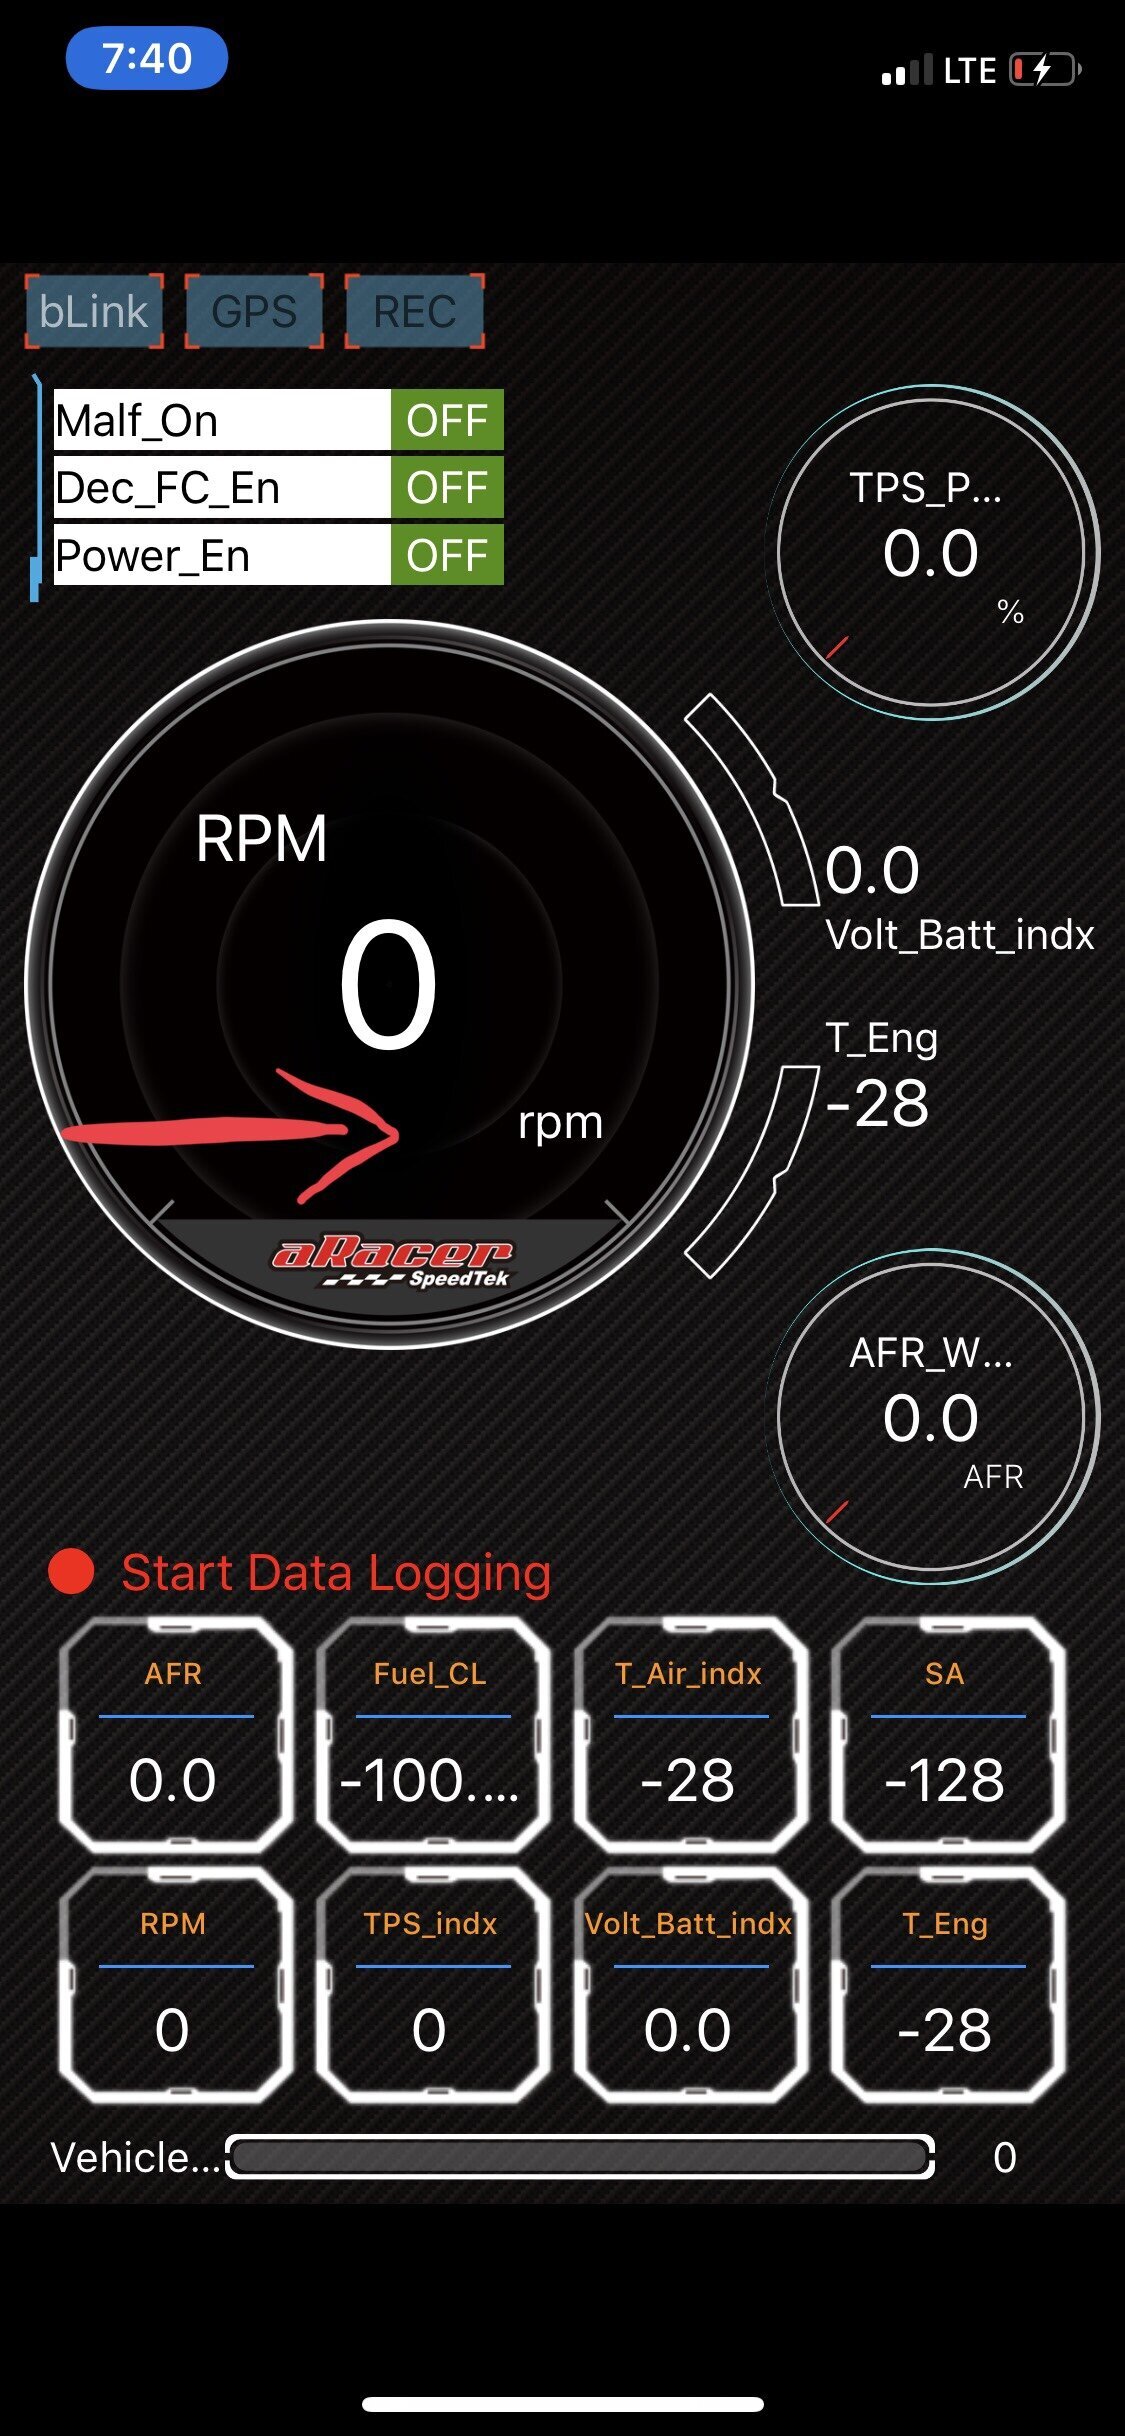
Step 2 - This is the first screen you will see upon opening the application. From the left of the screen, swipe right to open the menu.
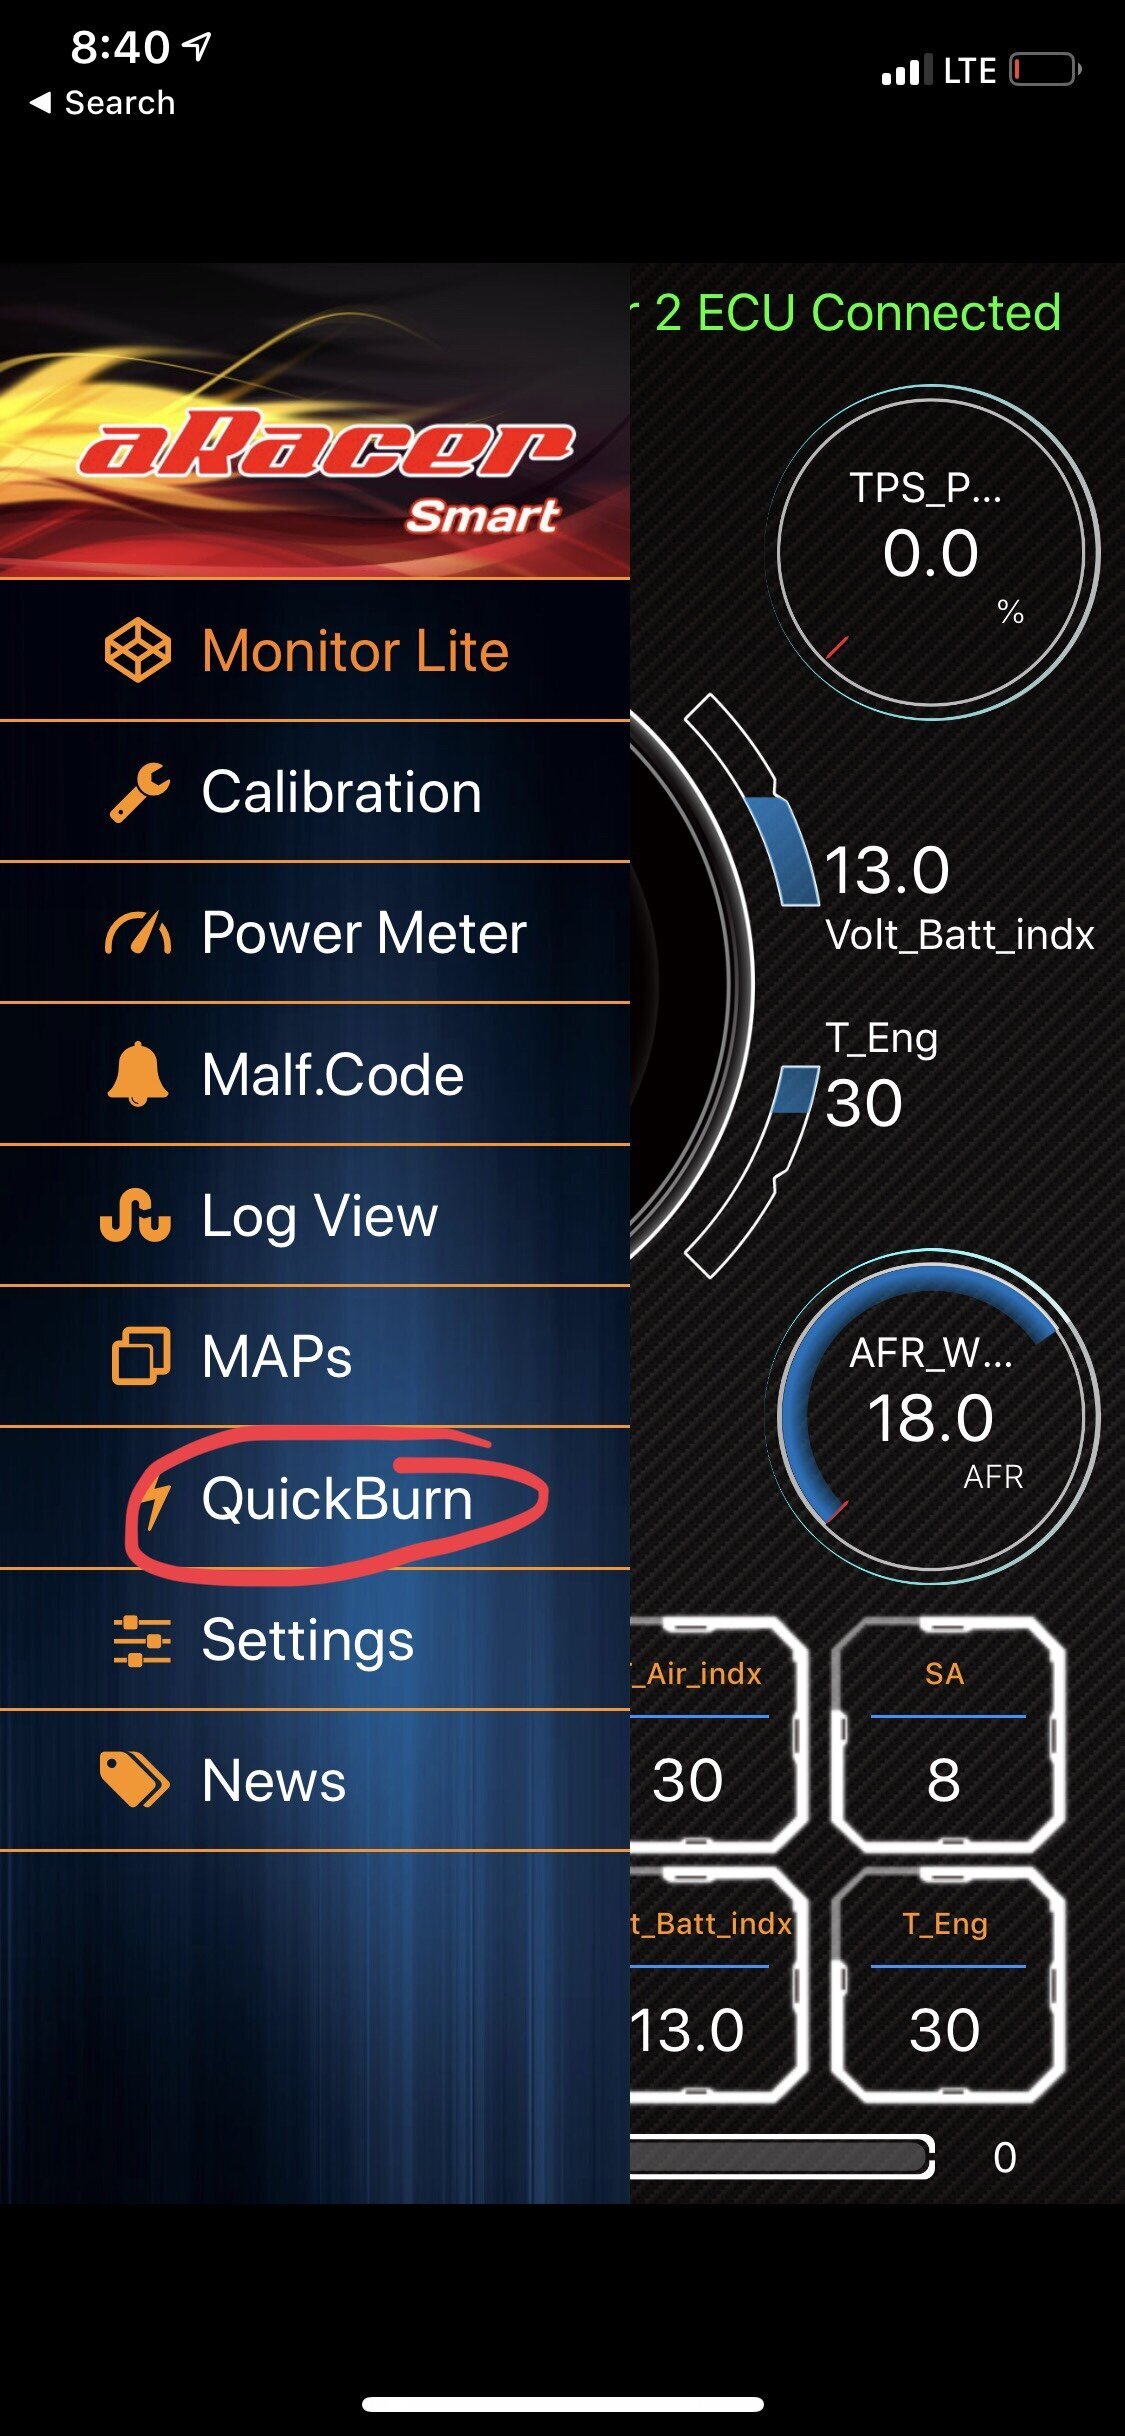
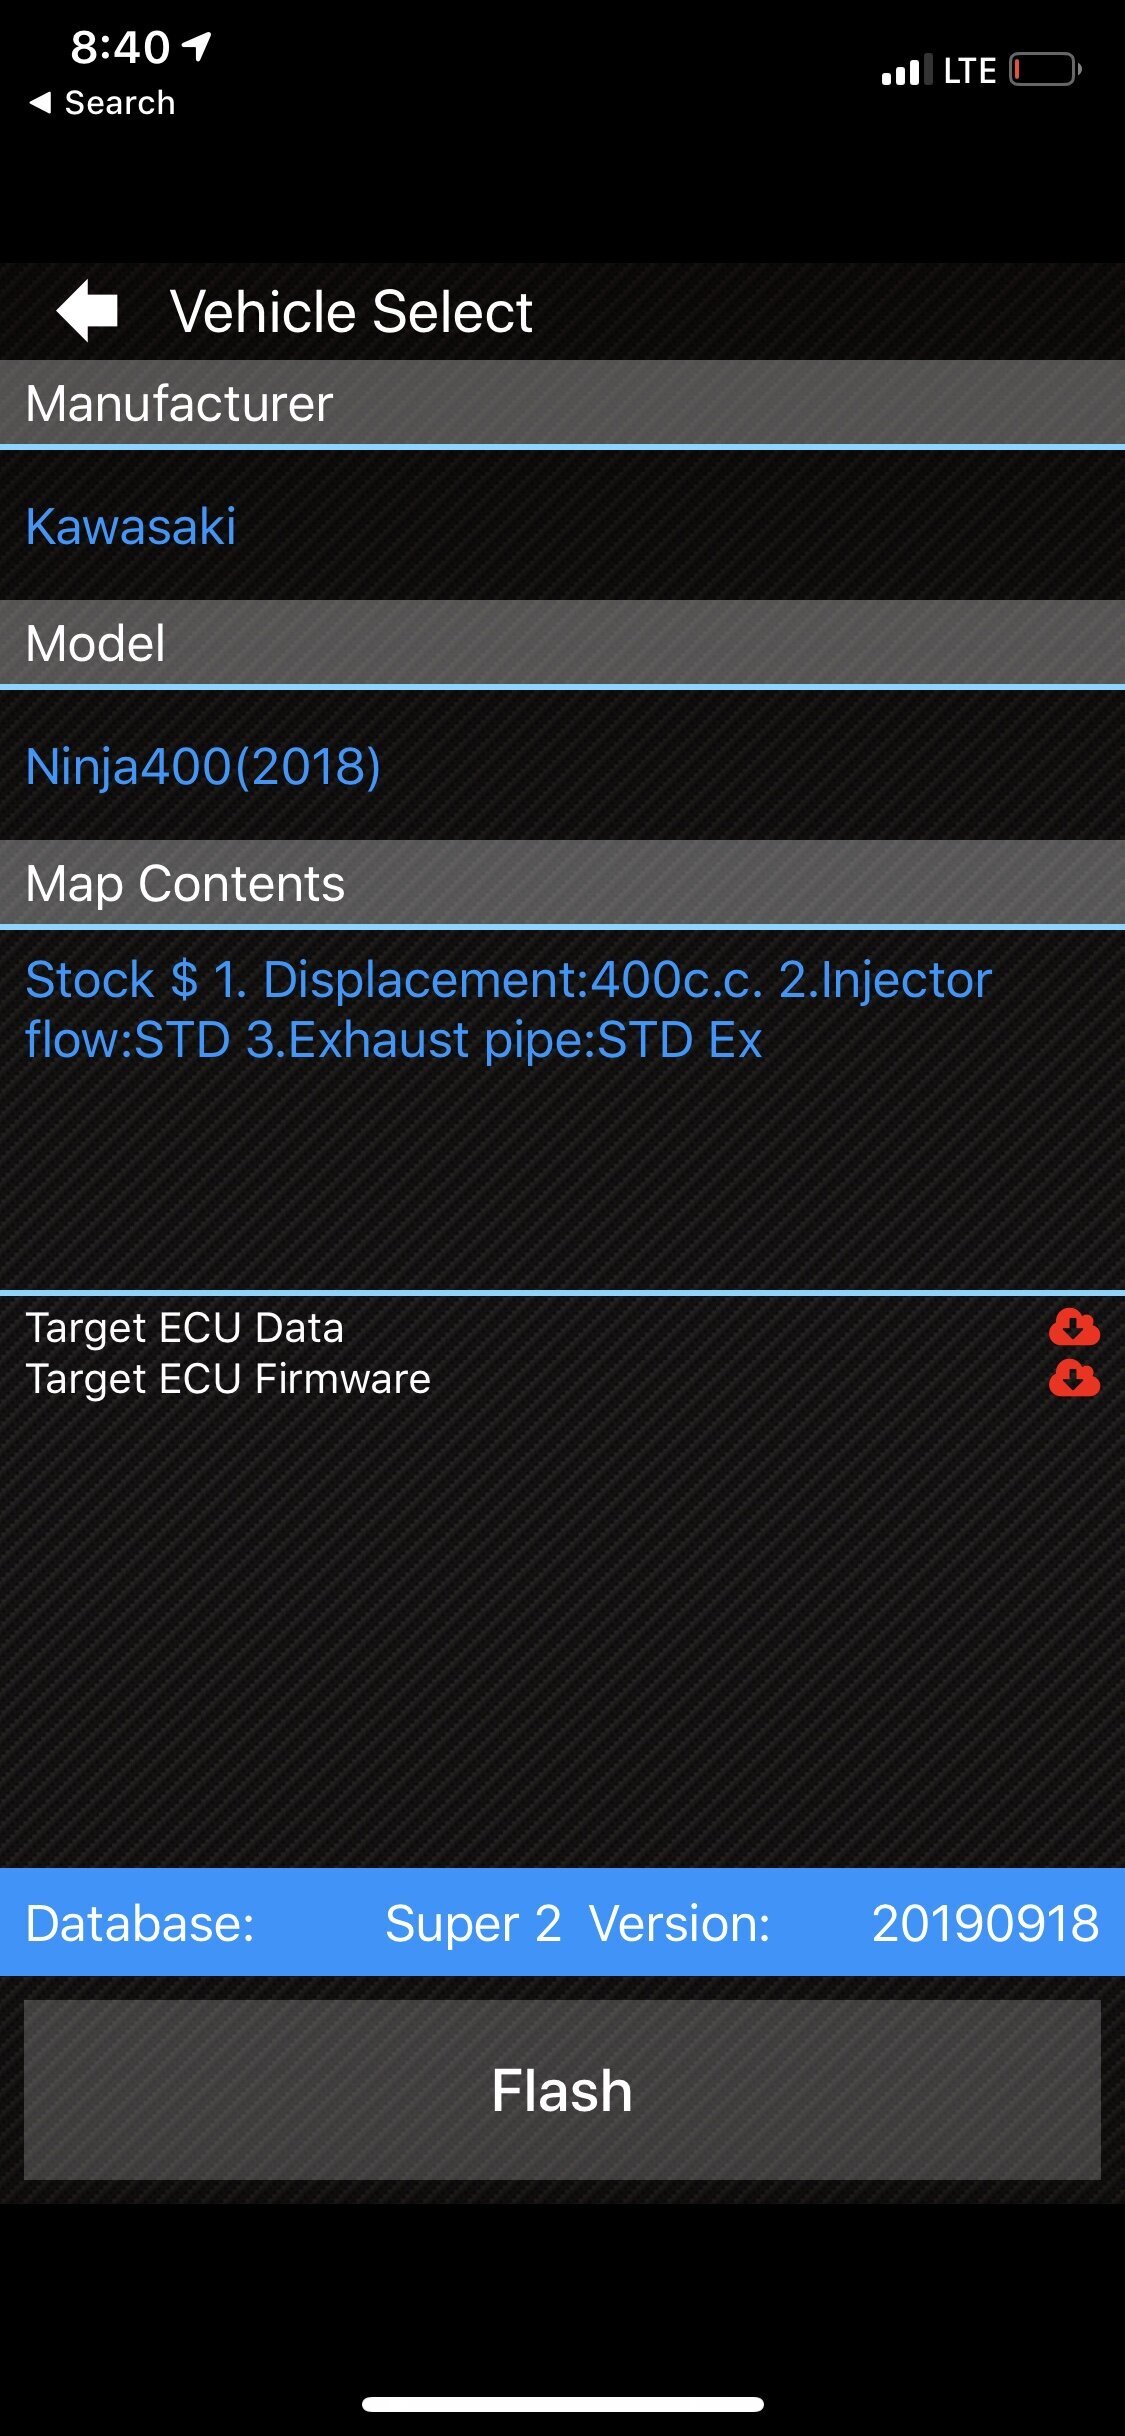
Step 3 - Open the settings tab at the very bottom and connect the blink Bluetooth module to your phone. From here - Flash the ECU to your year/make/model by using the “Quick Burn” tab. This will take a few minutes. Keep in mind, this is a very simple base map. It is not designed for big bore, different camshafts, etc. Generally the base map would be okay for an intake and exhaust setup. It would be up to the tuner or AF1 autotune module (which will discuss later) to acquire a reliable map.
Note FOR HONDA GROM/MONKEY - The top two - Used for the 2014 and 2015 models. “Stock” will be used for 125cc whereas the cylinder bore 61mm will be used for the big bore kits. (Regardless if you have a 170cc, 181cc, 186cc, etc…
The middle two -Stock (2016) and Cylinder bore 61mm (2016) will be used for 2017+ models. ***DO NOT USE 2018 FILE REGARDLESS OF YOUR YEAR WITH HONDA GROM! The Tachometer will not work with the 18’ flash!***
The bottom two - Stock (2018) and Cylinder bore 61mm (2018) are used with the Honda Monkey.
Step 4 Calibrate TPS - Using the main menu (drag from the left screen to the right as previously done), click the calibration tab.
Scroll to the bottom and perform a TPS Calibration procedure. Failure to do this can results in the throttle position reading different than the ECU. Imagine you are wide open throttle, however the ECU only thinks you are 85% open. Not good!
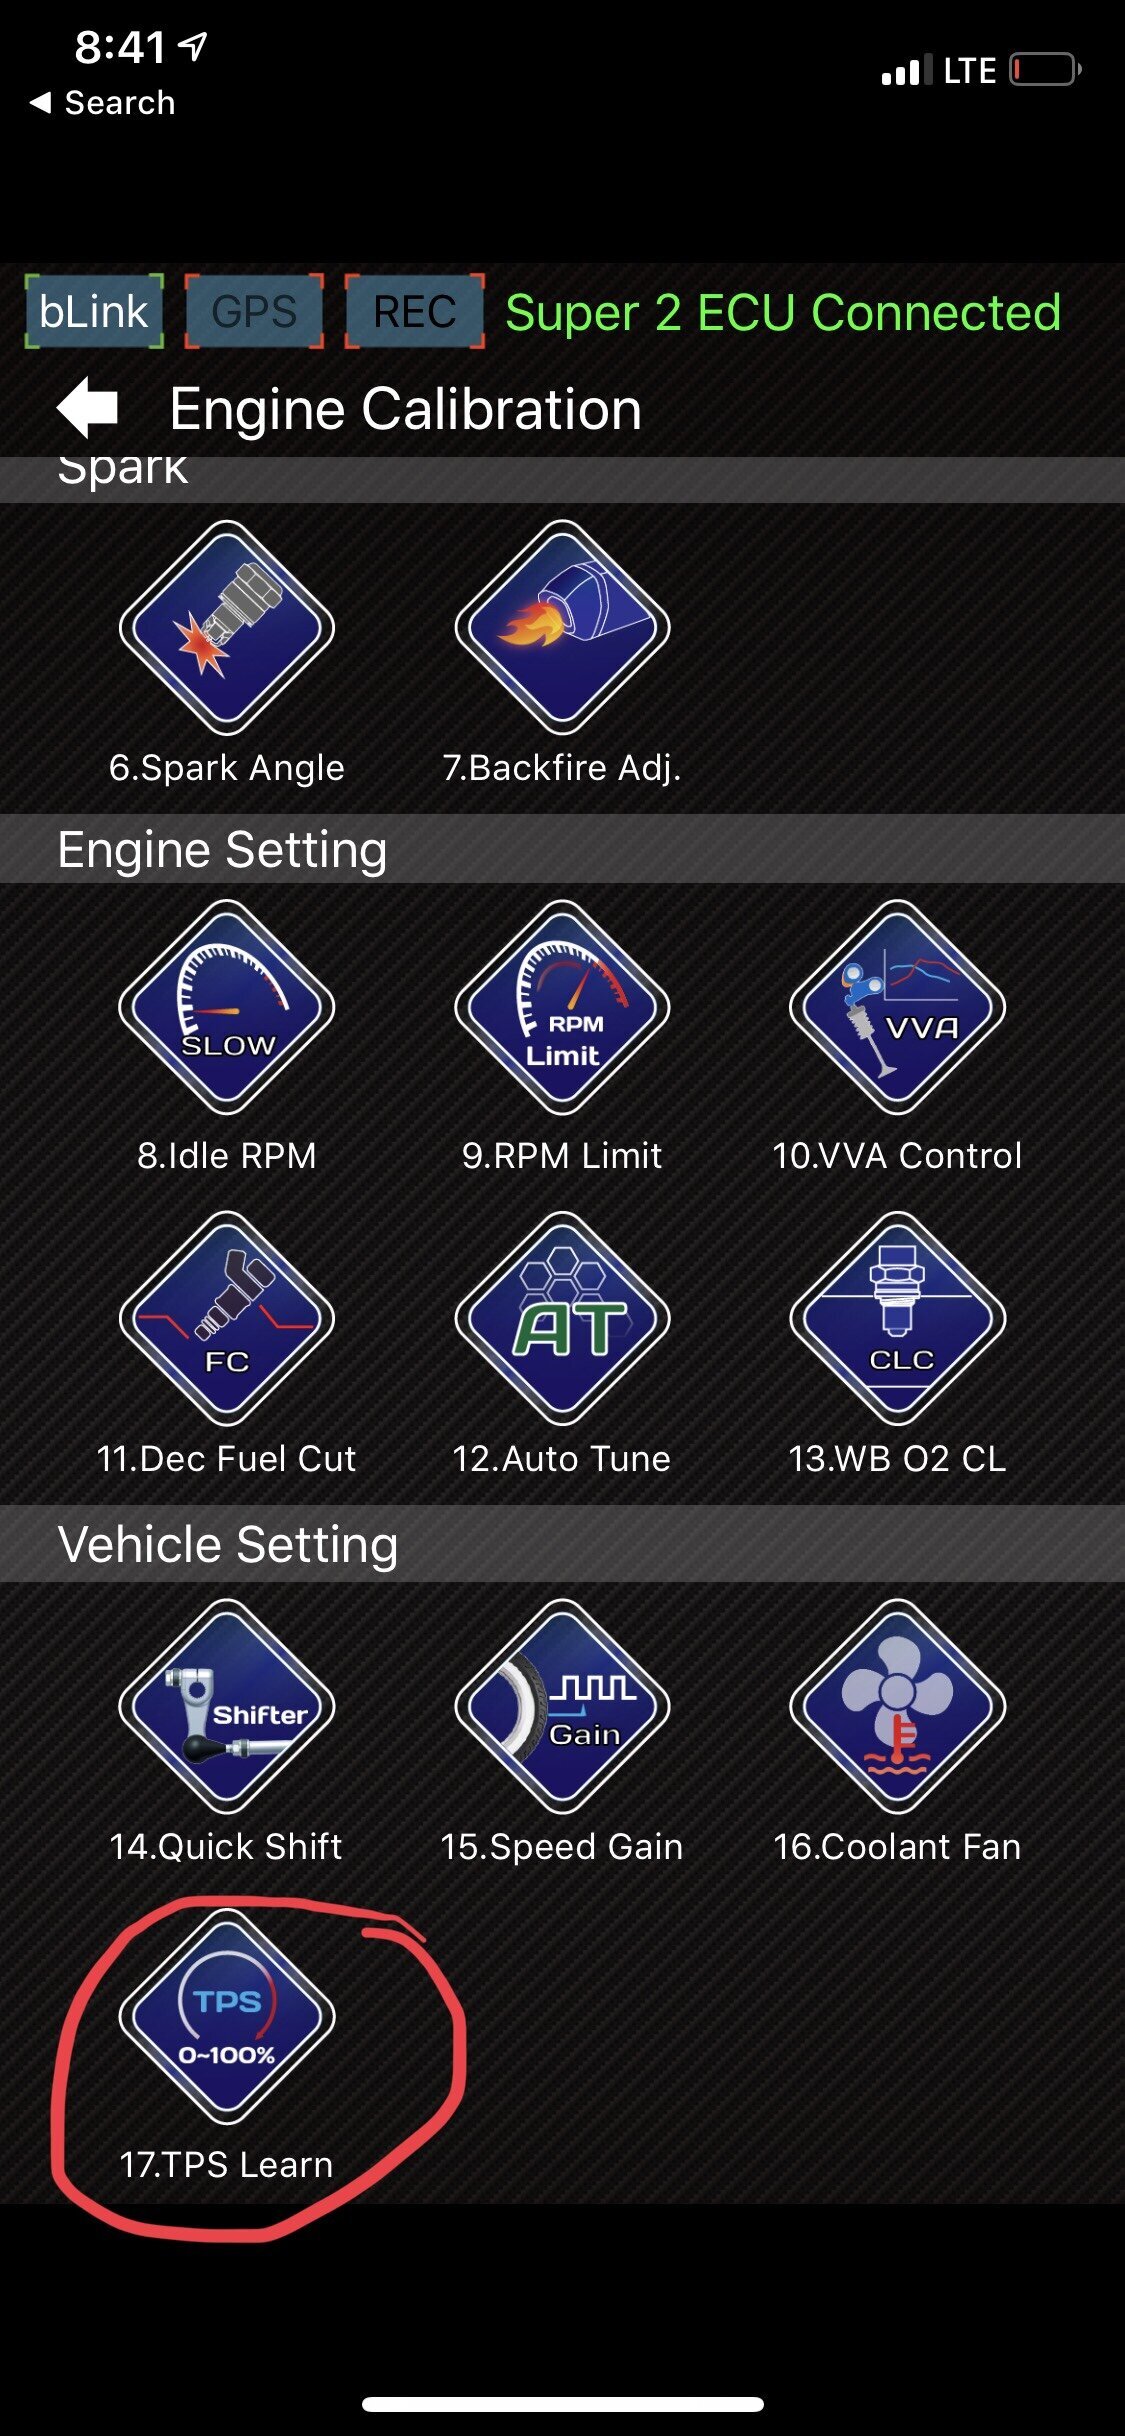
TPS Calibration - Hold your throttle wide open and press “start learning”

Step 5 - Set Fuel Base (AF1 Module Required)
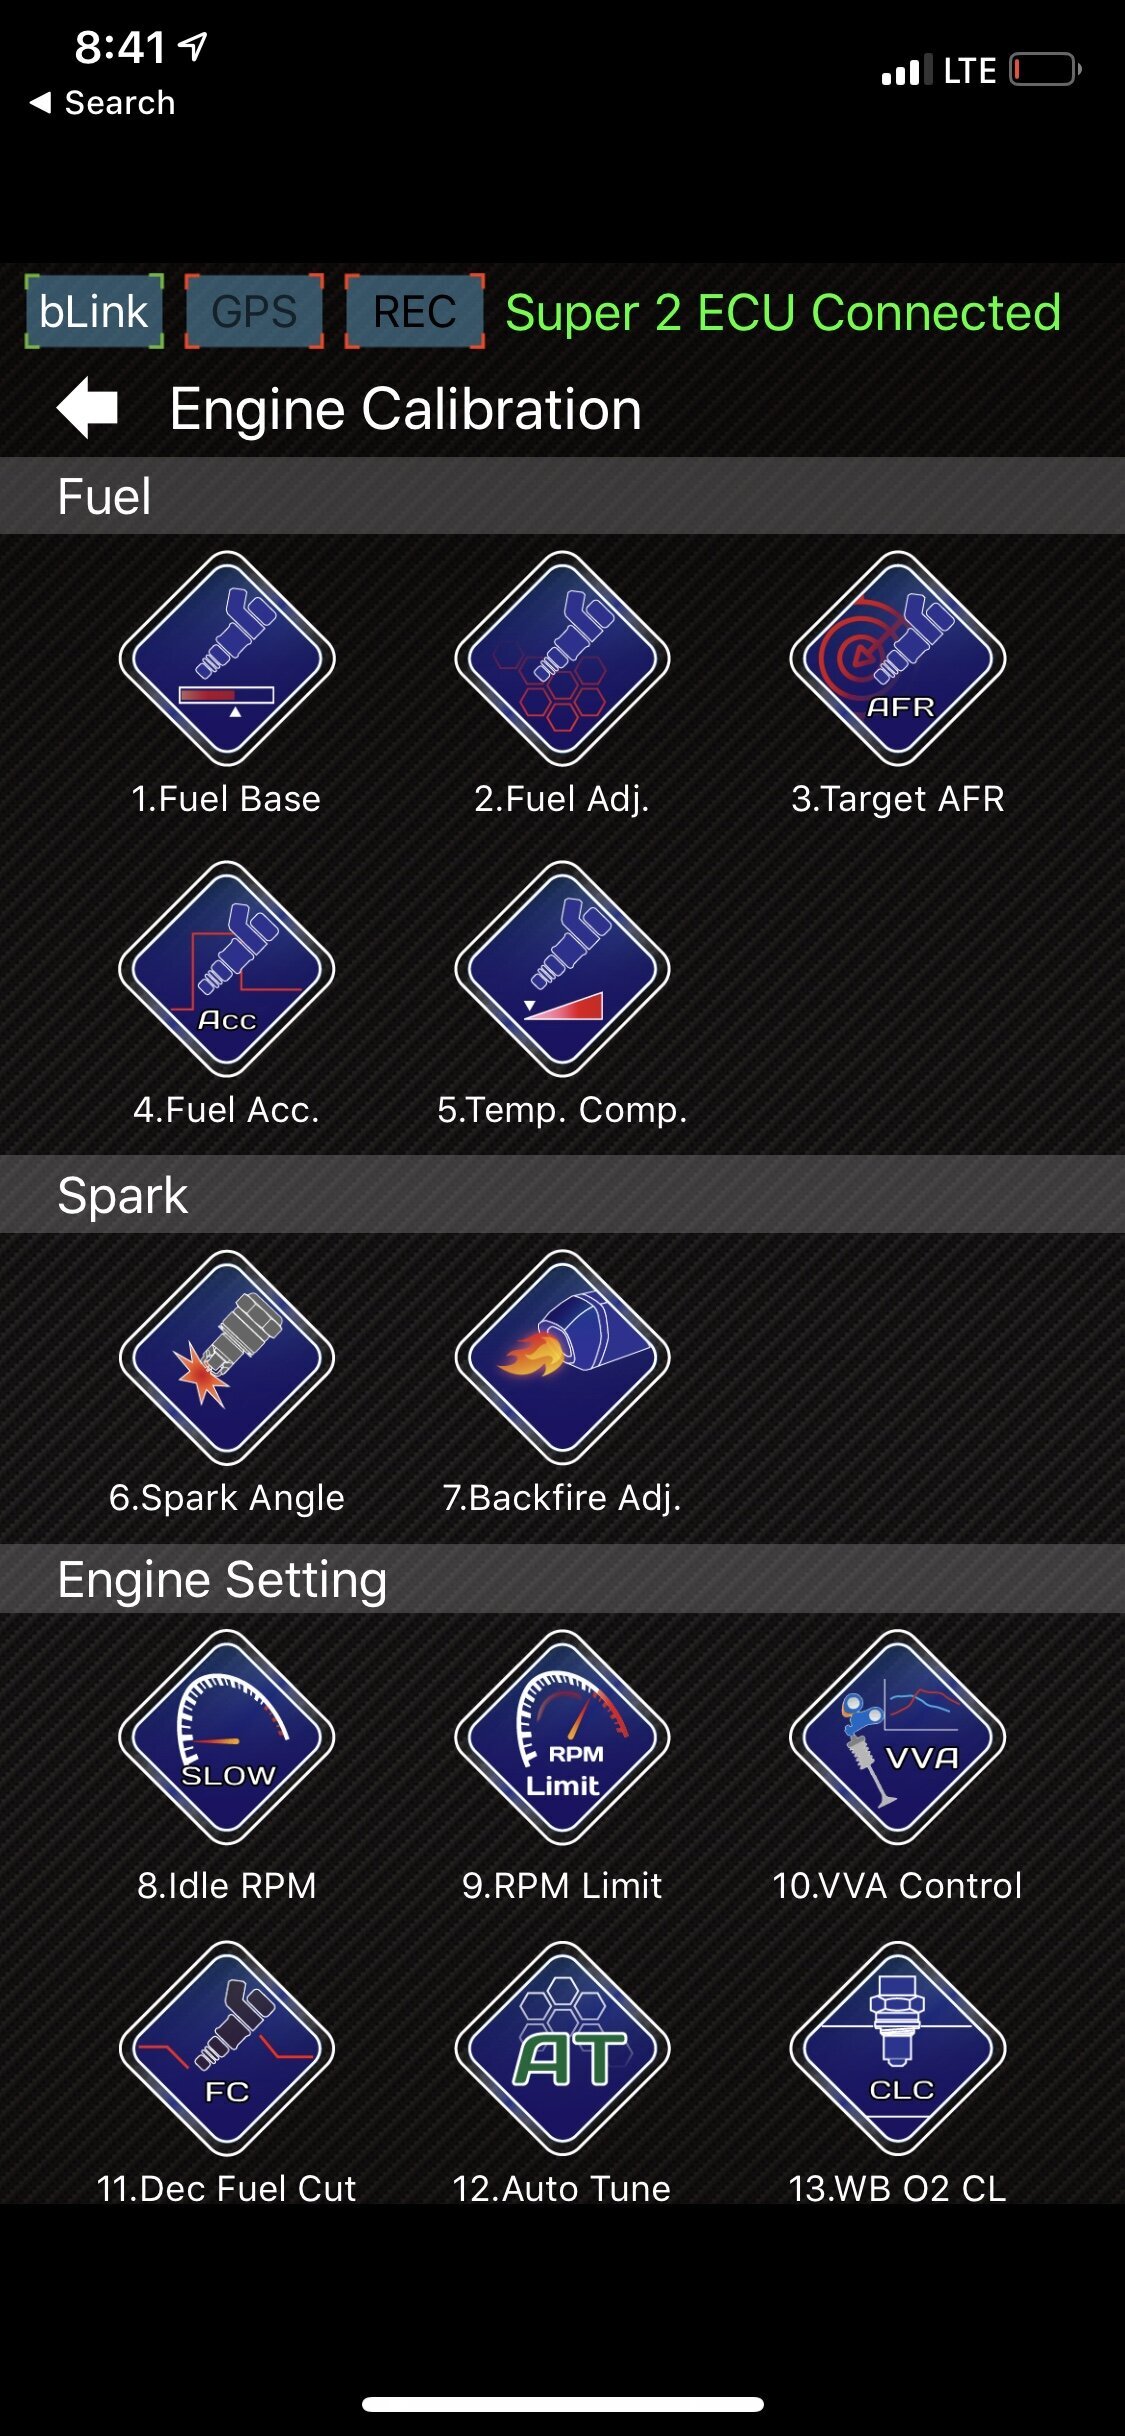
This will be the first option in the Calibration screen from the main menu. This is very important as the modifications increase, especially with a different injector. To change this to 110 would be increasing the overall fuel table 10% (richer). To change this to 90 would bring the overall fuel table down 10% (leaner).
Calibrating the fuel base should be done below 80* C on the older tunes, 60*C on the newer maps (Sept 2019 and later).
To Calibrate Fuel Base -
- Key on ignition and start the bike, ensure you are linked to the software.
- While the bike is coming up to temperature, watch AFR WB02 CAL from the main menu’s “monitor” tab. If the reading is below 13, lower the fuel base to give the bike more air, If the reading is roughly 13.7 or higher, add to the fuel base to richen the AFR_WB02. This is located in the middle of the screen. Generally 5% at a time works well if you have never done this. Experienced tuners can dial this in much quicker with larger changes. As you get closer, 2% changes are normal. Keep in mind you may not be able to keep it EXACTLY between 13.0-13.3, ensure it is close as the autotune in the next step will take over to dial it in. The autotune has trims to help smooth and bring the idle to a proper steady rpm. If your rpm is not where it should be and much higher or lower, adjust your mechanical parts first. For example the Honda grom has an Air/Fuel screw on the left side (this can vary, I have seen it range from 1 to 3 turns out) of the throttle body and an Idle screw on the right side where the cables link into the butterfly.
- The AFR WB02 CAL will not stay completely steady, it can fluctuate up to 1.0 but generally stays within .5-.7AFR upon the first warm-up. (For example: if you start the bike and the AFR WB02 CAL is showing 11.0-11.3, remove 5% and you will see it hover closer to 12, keep adding/subtracting until you are close to your target 13.0-13.3 AFR.
- Another method to speed up the initial change is to divide the target AFR (13.3) by the WB02_AFR. For example if your WB02 AFR reads rich at 11.0, take 13.3 divided by 11.0 = 1.209 = 21%. Remove 21% from the fuel base to close in on your target AFR. If it read 15.0, then 13.3/15=.88 = 12% change needed.
Step 6 - Enable Autotune
Click “12. Auto Tune” to open the autotune screen which will look like the image below. Tap the arrow to move from left or right to enable/disable autotune. Autotune must remain over 60*C engine temperature to ensure it is enabled. If it drops below the 60*C it will shut off.
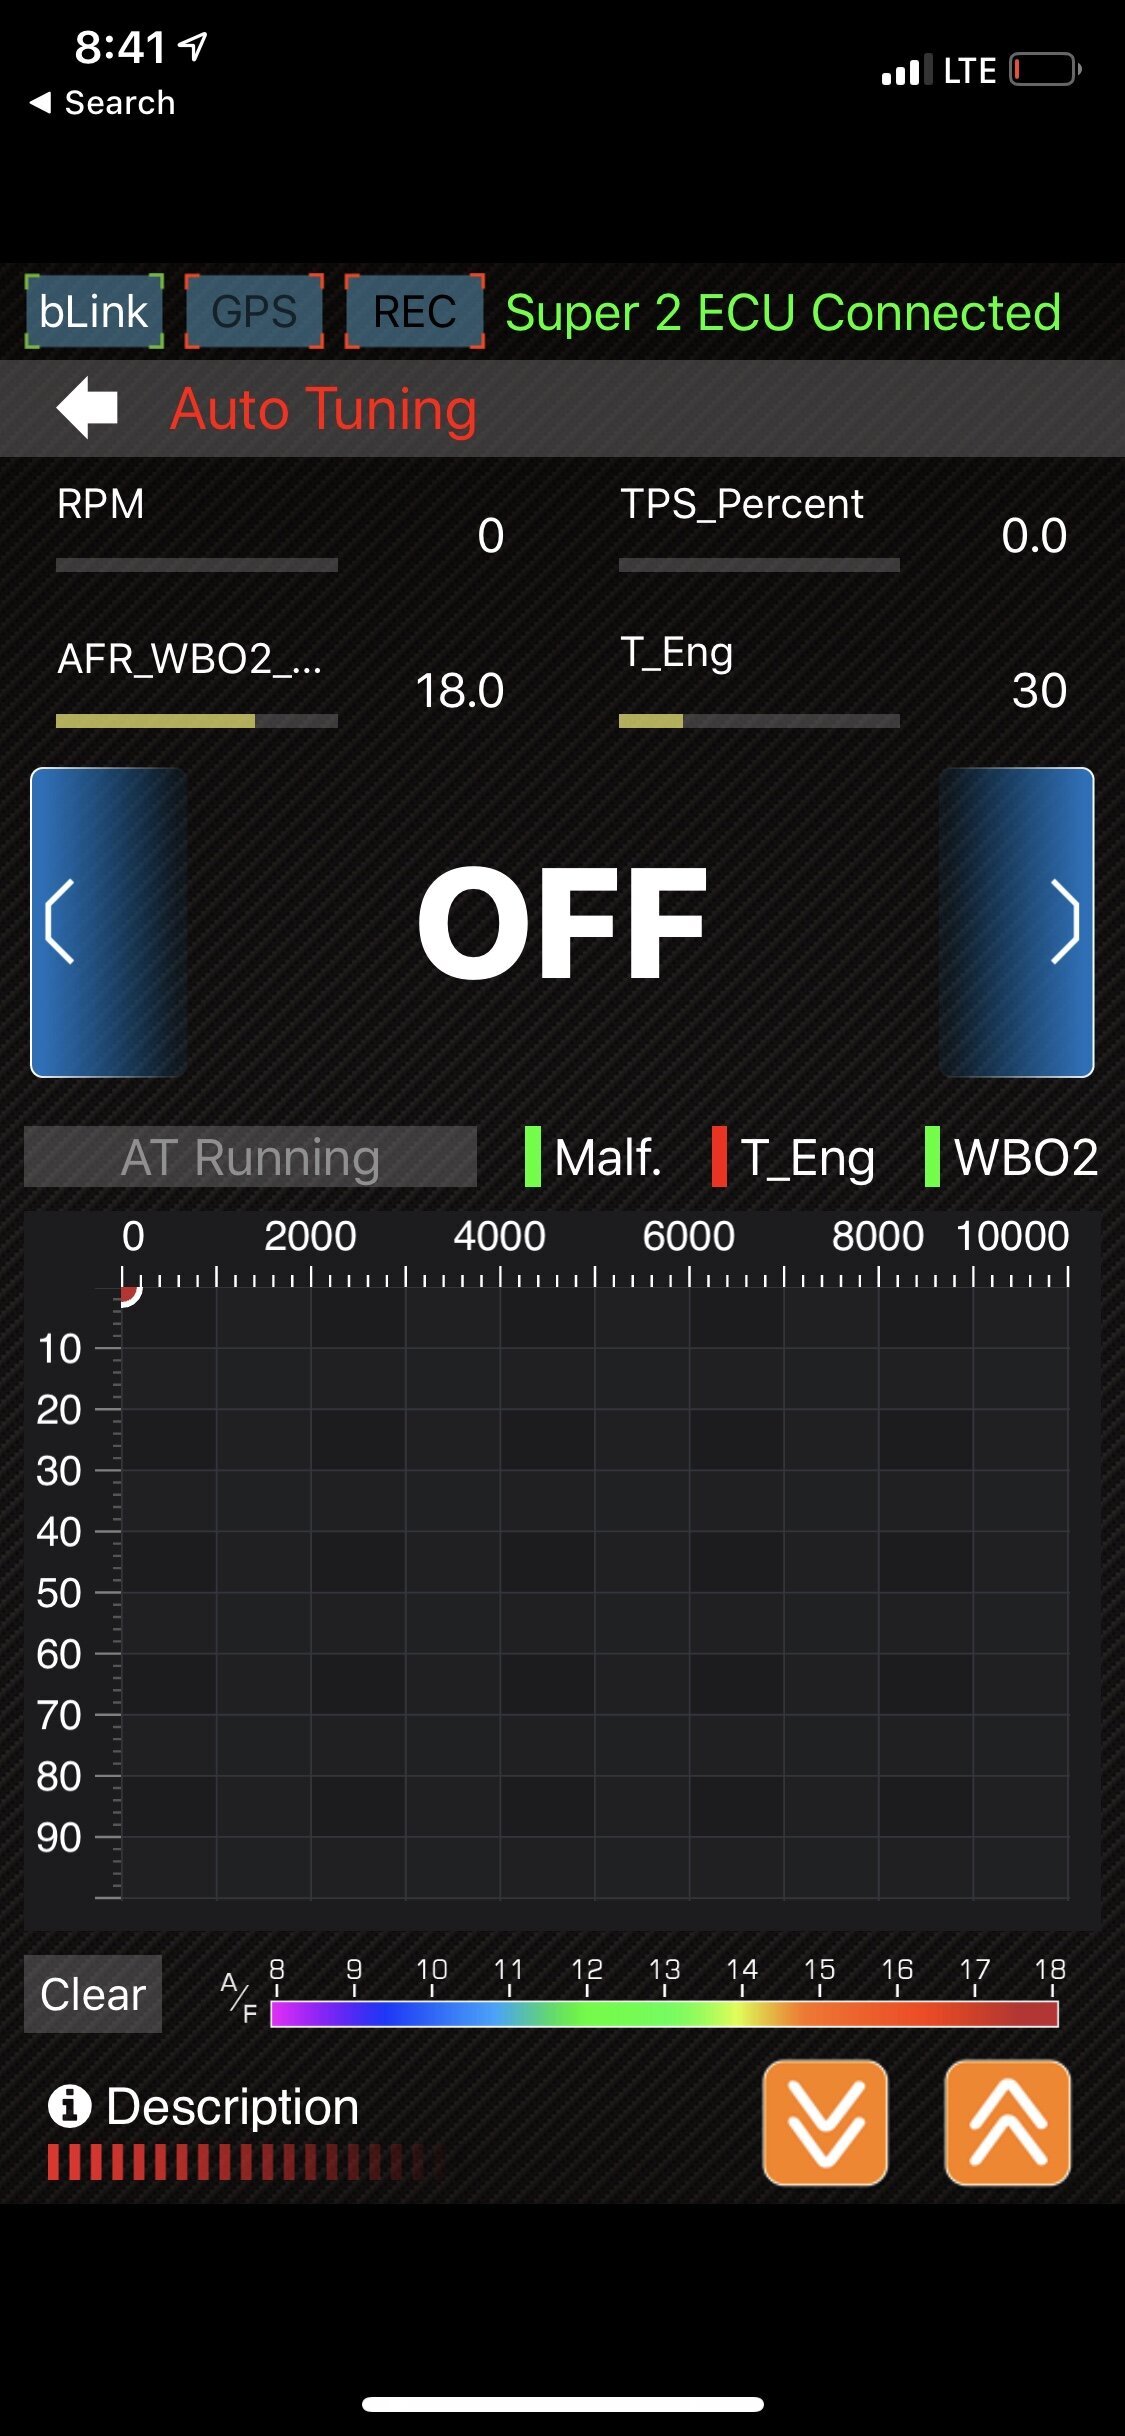
Understand the bike may not run very well starting off, the aRacer ECU learns very quickly and you will notice a difference as you put more miles on the bike. Modulate the throttle starting in the lower rpm working into the midrange and higher rpm. Vary through every range and scenario you can, slow/fast acceleration and partial throttle across the ENTIRE rpm range. When you are satisfied with the map, turn off autotune. Autotune is designed to build a map and not run 24/7. If you do not plan to monitor your AFR”s with AFR_WB02_CL, remove the sensor and set aside for future use. If you do plan to monitor WB02 AFR, just be mindful for strange activity. If the bike feels great but AFR’s are all over the place it’s possible the sensor may be faulty. A sensor is a wear item, I recommend not running autotune all the time. If the sensor goes bad and tells the ECU false information, the ECU will compensate for that and screw with the tune it originally created. I have seen sensors last 10k miles, and I have seen them go bad in 200 miles.
Speed Tuning Super Setup Guide -
Step 1 - Open Speed Tuning Super -
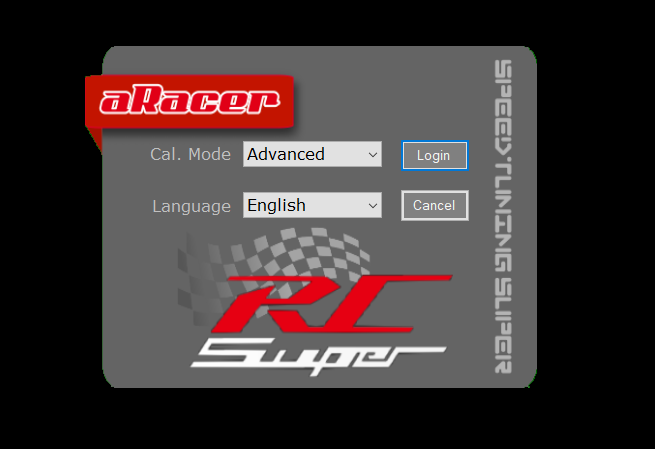
Step 2 - After this screen, you will be prompted to enter a serial number and license number. This will be located on a card that comes with your ECU. The basic setting will have 9 parameters, advanced has 70 parameters.
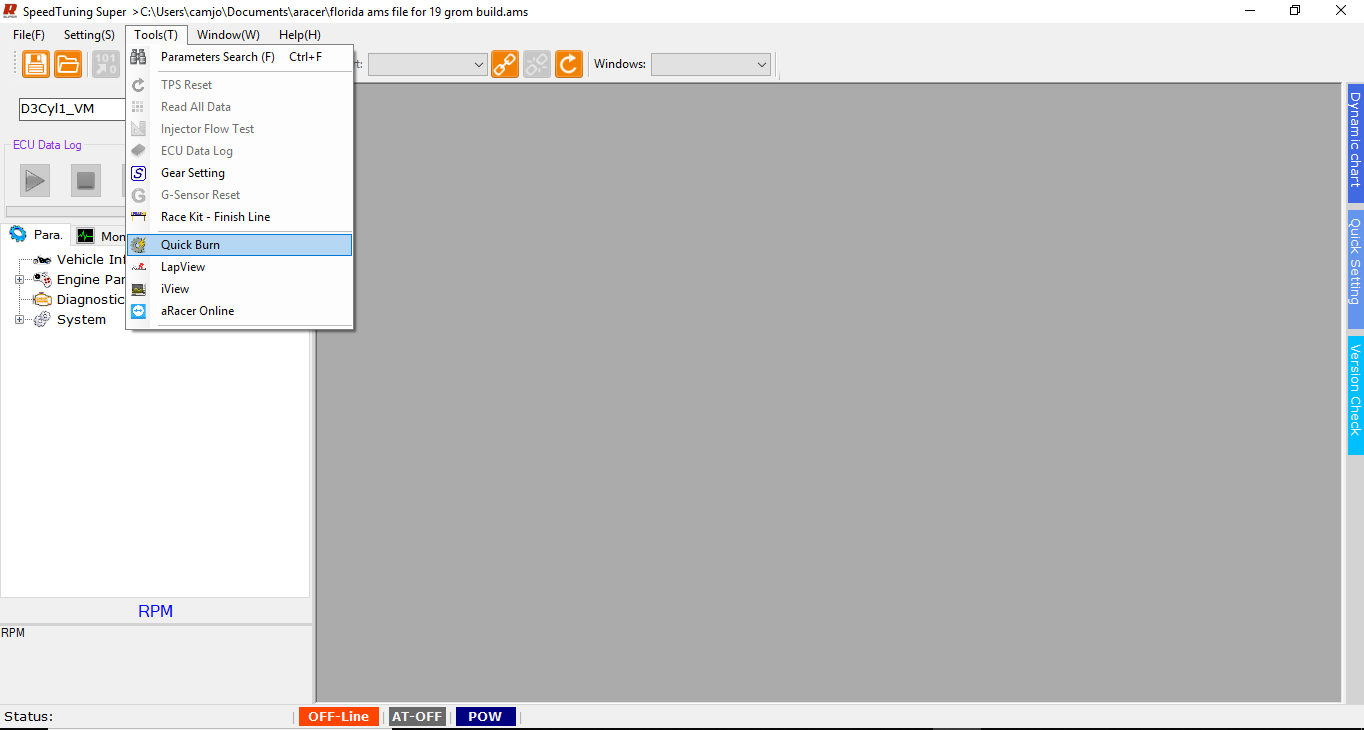
Step 3 - Start by using the quickburn located in the tools tab. This will allow you to flash the base file onto your model to get started.

Step 4 - At the top of the quickburn software, you will click the cloud with the arrow as shown in the image above and a download bar will begin as shown. This will download the base files to the quickburn software.
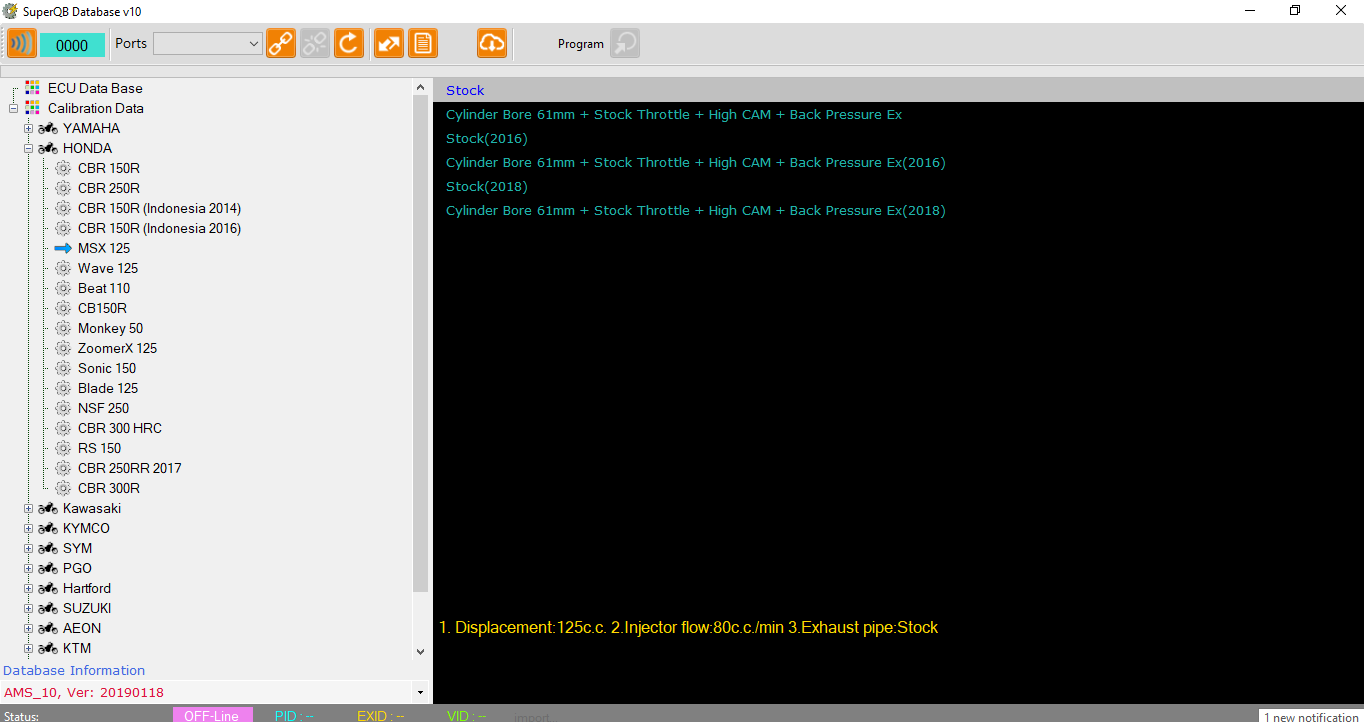
Step 5 - The top two - Used for the 2014 and 2015 models. “Stock” will be used for 125cc whereas the cylinder bore 61mm will be used for the big bore kits. (Regardless if you have a 170cc, 181cc, 186cc, etc…
The middle two -Stock (2016) and Cylinder bore 61mm (2016) will be used for 2017+ models. ***DO NOT USE 2018 FILE REGARDLESS OF YOUR YEAR WITH HONDA GROM!***
The bottom two - Stock (2018) and Cylinder bore 61mm (2018) are used with the Honda Monkey.
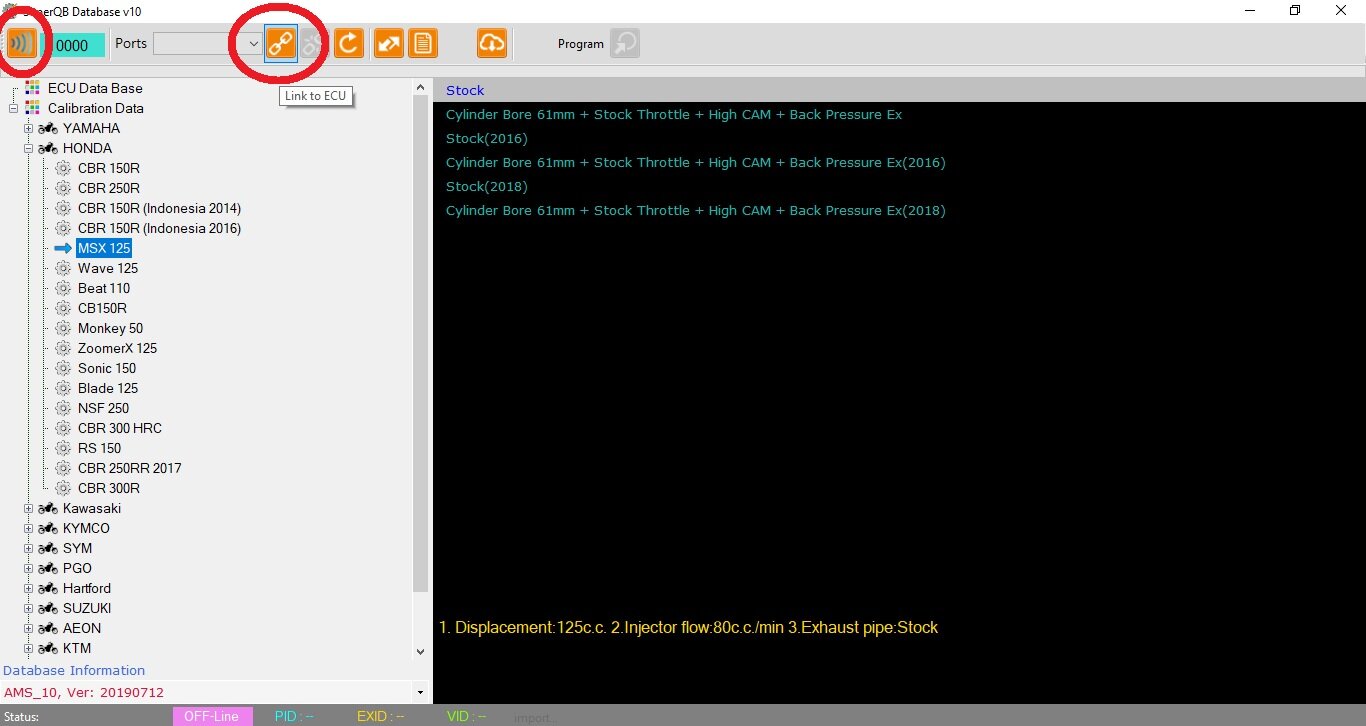
Step 6 - To link the ECU to the quickburn software, you will need to make sure your key and kill switch are in the ON position. Once key’d on, you can connect to the software via bluetooth using the b-link tab on the top left, or the tuning cable using the chain next to the ports dropbox. If you do not see your ECU in the ports dropbox, click the refresh button which is the counter-clockwise circle with arrow next to the link/unlink tab.
NOTE - IF YOU HAVE ALREADY LINKED YOUR ECU TO THE SPEED TUNING SOFTWARE BEFORE/AFTER OPENING QUICKBURN, YOU WILL NOT BE ABLE TO CONNECT TO QUICKBURN. UNLINK ECU FROM SPEED TUNING SUPER BEFORE LINKING TO QUICKBURN, THESE ARE DIFFERENT SOFTWARE APPLICATIONS.
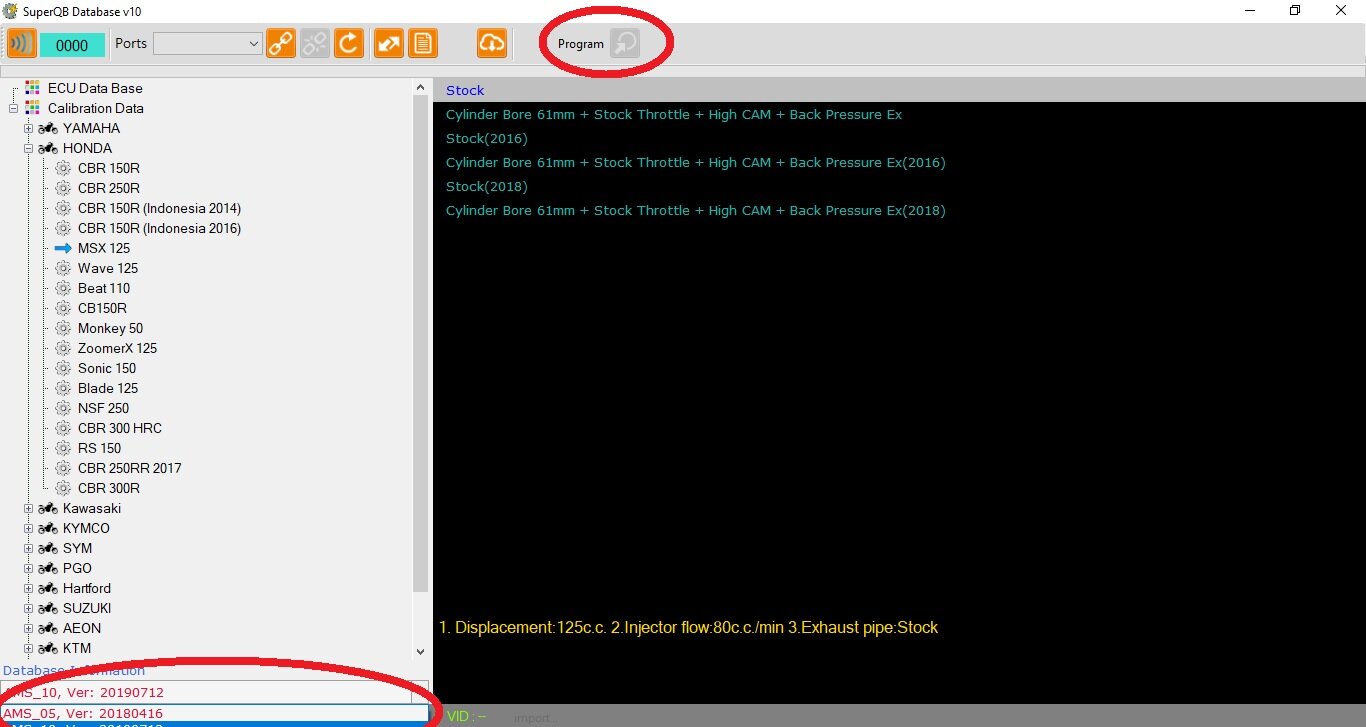
Step 7 - Once you are connected, (picture shown above not connected as I am away from the bike at the moment), click program. This will flash the base file to the ECU.
NOTE - The bottom left that is circled is the AMS version. If you receive an error in the next few steps, where the MAP FILE and ECU CORE do not match, you will need to change this and re-program ECU to match the two.
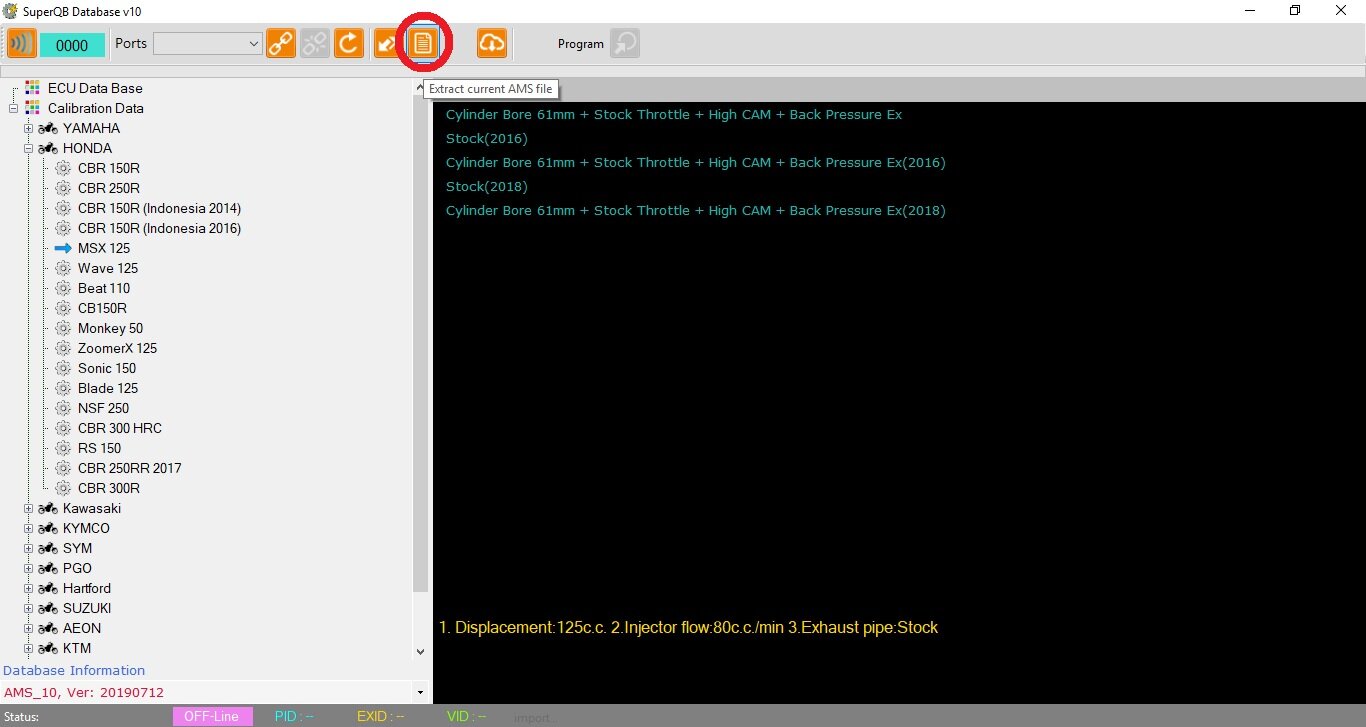
Step 8 - Extract current AMS file - Extract the same file you programmed to your ECU. This will save the file to your computer which will allow you to make changes to the ECU. If you do not extract this file, you will not be able to tune your ECU with the Speed Tuning Super Software.
After flashing the ECU and saving the AMS file, disconnect from quickburn, close and continue with the Speed Tuning Super software.
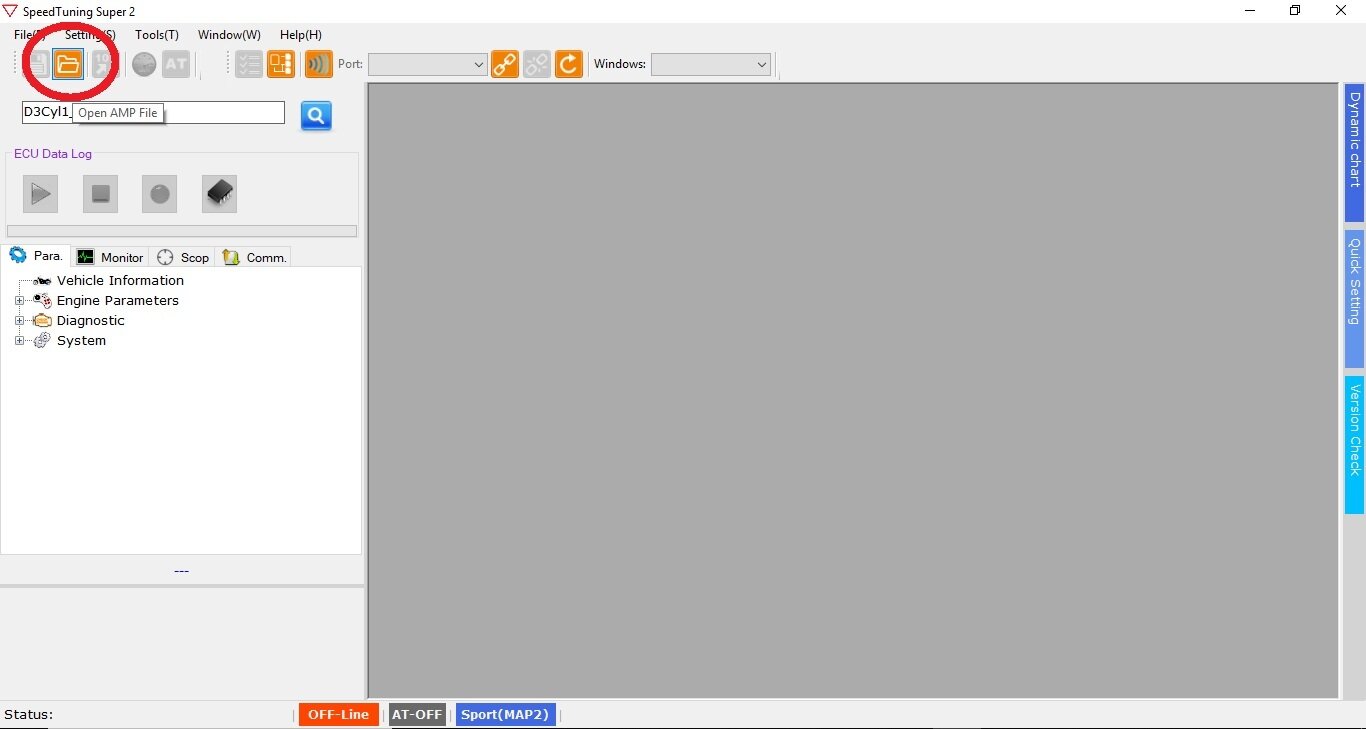
Step 9 - Back in the Speed Tuning Super Software, click the top left “Open AMP File”, this will be the AMS file you extracted from the quickburn to save to the computer. This will place the tuning file into the software so you can make changes and send them into the ECU.
IMPORTANT NOTE! - Use the “SAVE” button located left of the “Open AMP File” after each change you make. This will ensure data is not lost while calibrating the ECU to your bike.
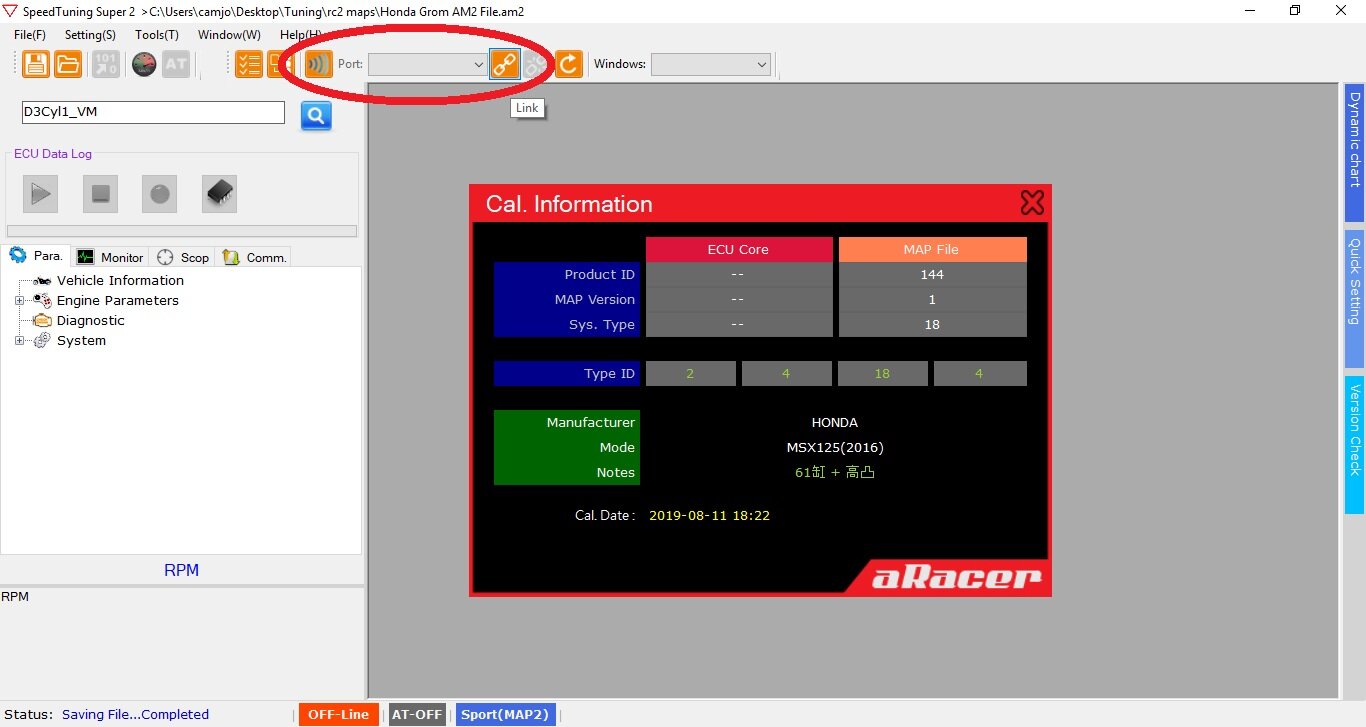
Step 10 - After loading the file, you will see this screen. From here, link your ECU in the same way you did quickburn, the left “air-wave” icon for bluetooth, or the chain for tuning cable. Once linked, the ECU Core and MAP File should match. If they do not match, refer to step 7 in which the bottom left version number may need changed. Reprogram ECU and extract the new file after changing the Map Version number.
Step 11 - Calibrate your TPS as your first step in configuring your base settings. (more images coming soon)
- SAVE FILE
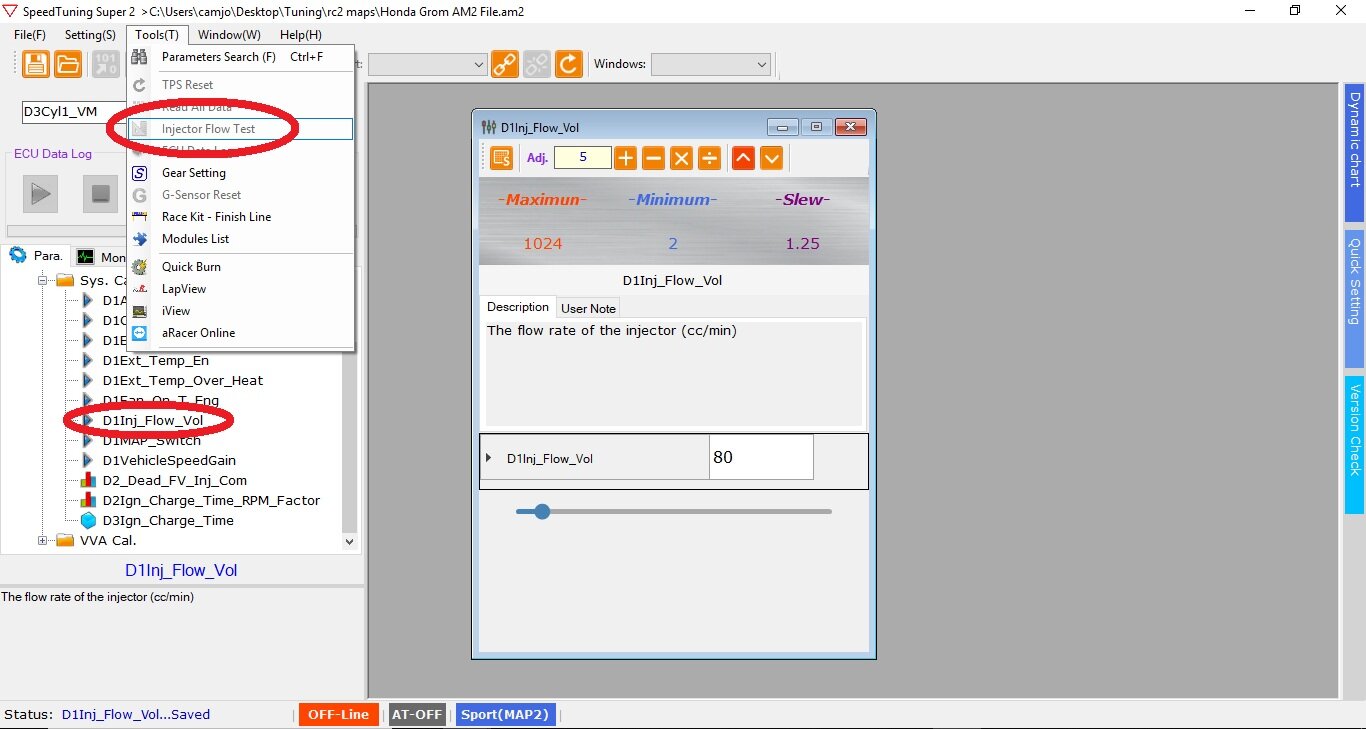
Step 12 - Set Injector Volume, this is the CC’s the injector flows in 1 minute.
OEM injector - 80cc (This injector maxes out at roughly 13-14hp)
PCX Injector - 129cc (which the software will change it to 128.75, this is normal) This injector flows best from around 14hp and maxes out around 26hp.
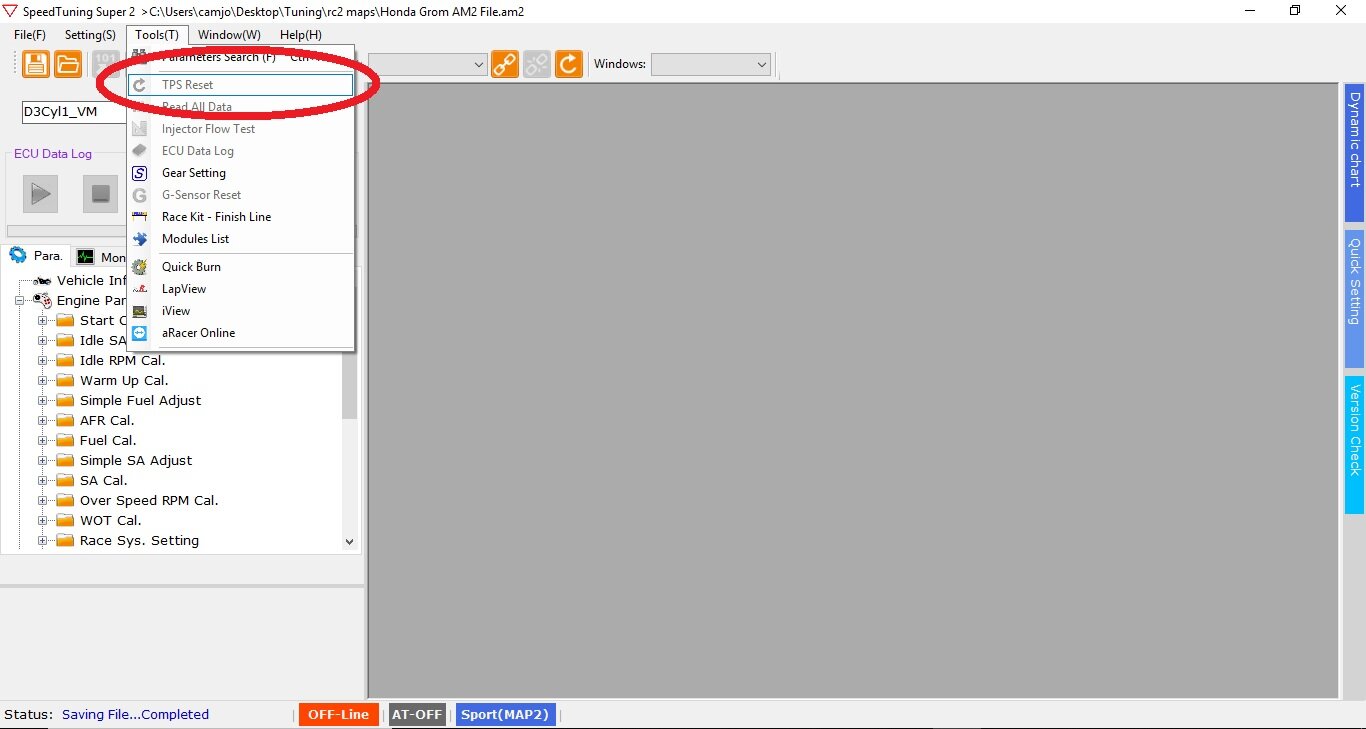
For other injectors not listed, you will need to do an “Injector Flow Test”. We will work on getting the other injectors updated as we get the volume.
- SAVE FILE
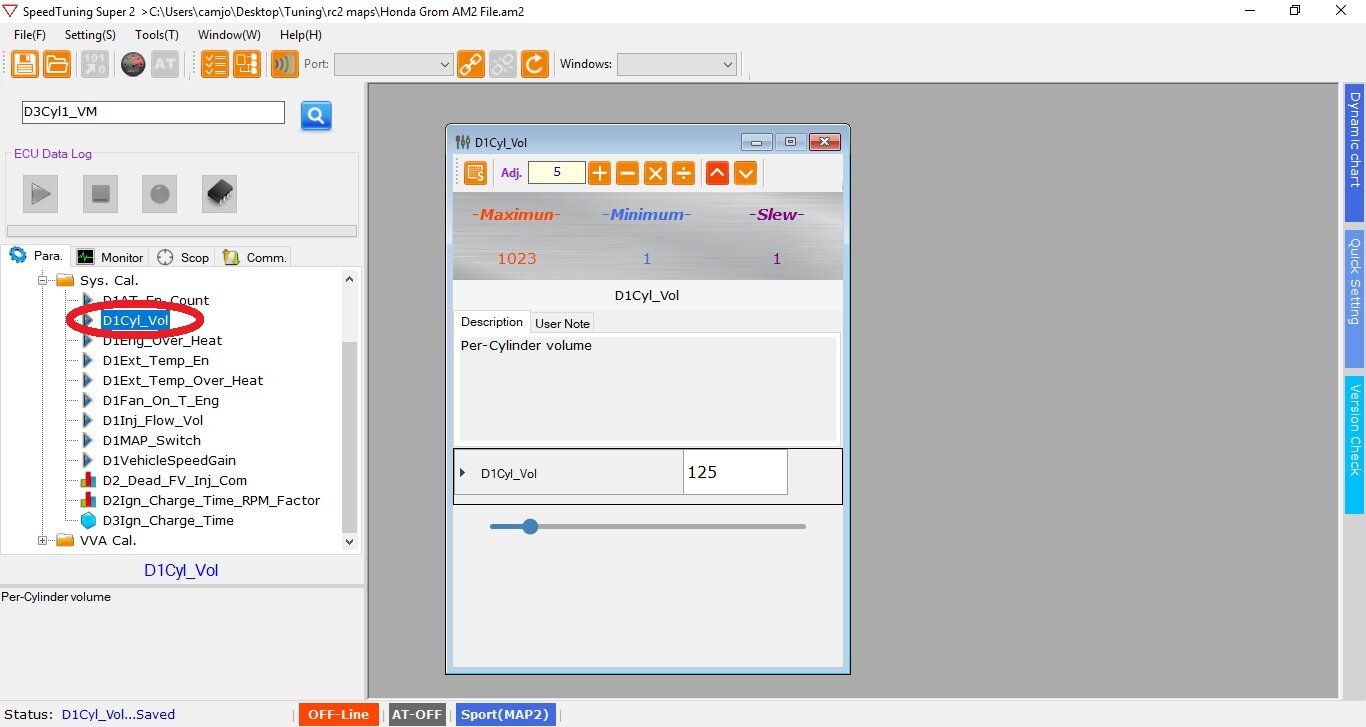
Step 13 - D1Cyl_Vol is the displacement of your model per cylinder. Stock is 125cc. If you flashed the 61mm option, this number will be listed as 170.
- SAVE FILE
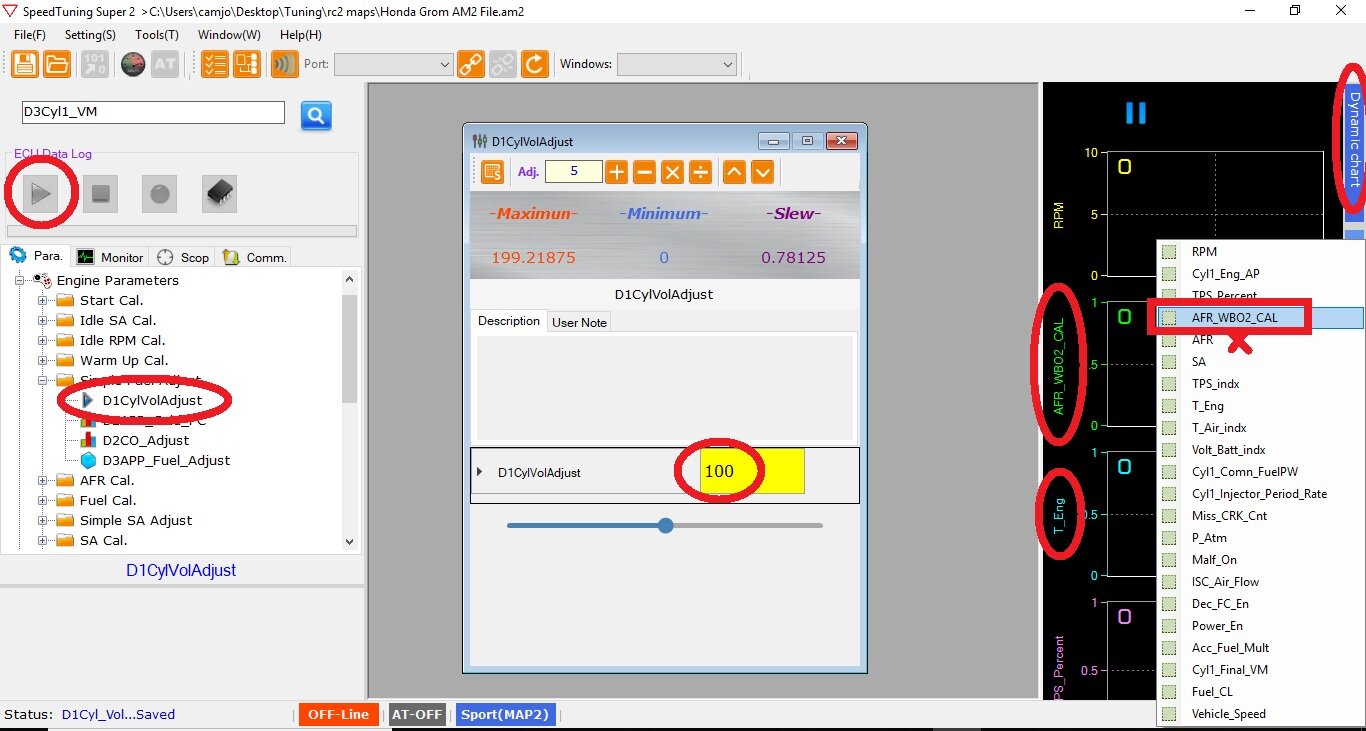
Step 14 - Calibrate Fuel Base - D1CylVolAdjust - This is also known as your “Fuel Base” seen in the aRacer IOS/android app. To change this to 110 would be increasing the overall fuel table 10% (richer). To change this to 90 would bring the overall fuel table down 10% (leaner).
Click “Dynamic Chart” on the right side of the software to open the live view screen. Right click to change the current setting to view “AFR_WB02_CAL”. This is the Air/Fuel Ratio (AFR) your AF1 Module (autotune kit) is reading in real time. Do not use “AFR” which is listed right below, that is the target AFR and does not change. I recommend adding “T_Eng” which is your engine temp in Celsius. Calibrating the fuel base should be done below 80* C.
To Calibrate Fuel Base -
- Key on ignition and start the bike, ensure you are linked to the software.
- Click the play button located above the parameters on the left hand side, this will sync the live data from the bike to the ECU, if you do not click this, you cannot view live data.
- While the bike is coming up to temperature, watch AFR WB02 CAL, if the reading is below 13, lower the fuel base to give the bike more air, If the reading is roughly 13.7 or higher, add to the fuel base to richen the AFR_WB02. This is located in the middle of the screen. Generally 5% at a time works well if you have never done this. Experienced tuners can dial this in much quicker with larger changes. As you get closer, 2% changes are normal. Keep in mind you may not be able to keep it EXACTLY between 13.0-13.3, ensure it is close as the autotune in the next step will take over to dial it in.
- The AFR WB02 CAL will not stay completely steady, it can fluctuate up to 1.0 but generally stays within .5-.7AFR upon the first warm-up. (For example: if you start the bike and the AFR WB02 CAL is showing 11.0-11.3, remove 5% and you will see it hover closer to 12, keep adding/subtracting until you are close to your target 13.0-13.3 AFR.
- Another method to speed up the initial change is to divide the target AFR (13.3) by the WB02_AFR. For example if your WB02 AFR reads rich at 11.0, take 13.3 divided by 11.0 = 1.209 = 21%. Remove 21% from the fuel base to close in on your target AFR. If it read 15.0, then 13.3/15=.88 = 12% change needed.
- SAVE FILE
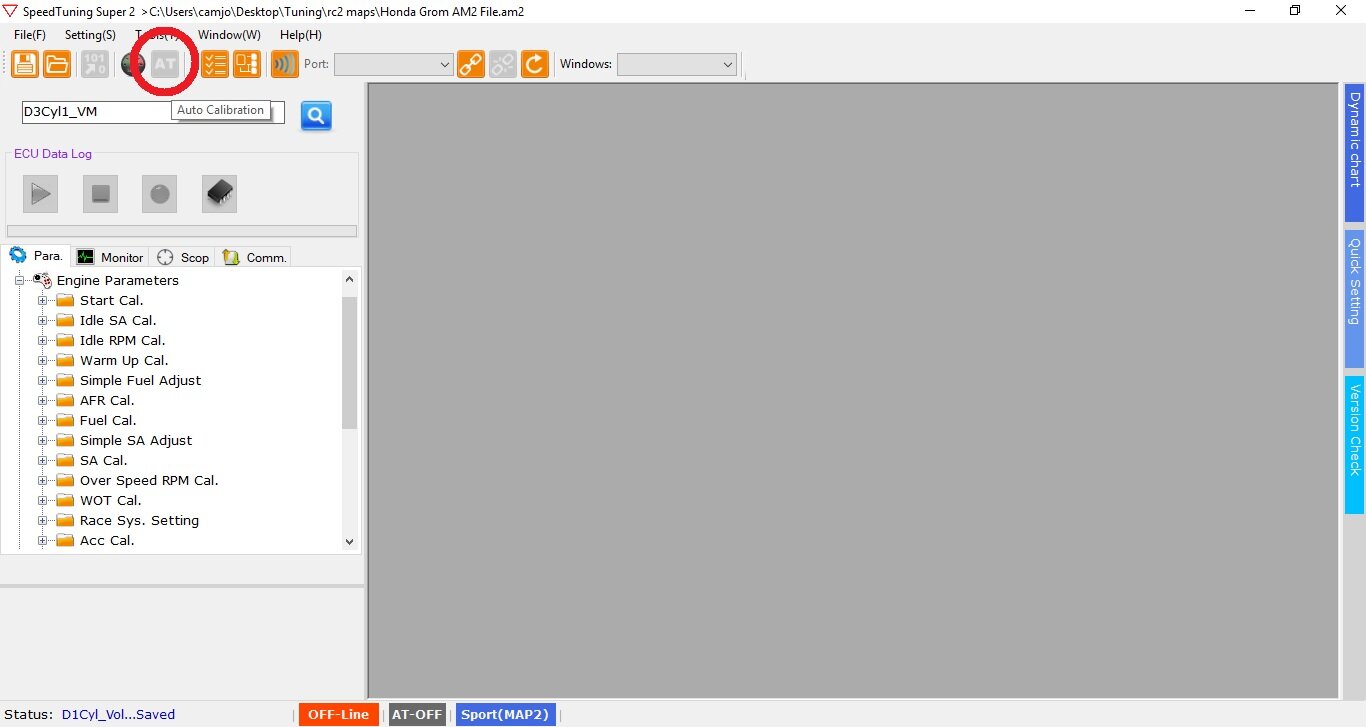
Step 15 - Turn on AutoTune via the AT tab located at the upper left area of the screen. When OFF, the tab will be orange while connected to the bike. When Autotune is turned ON, the AT tab will slowly flash red and orange. Autotune ONLY works over 80*C so ensure you allow the bike to come up to temperature and stay above that temperature while riding. Understand the bike may not run very well starting off, the aRacer ECU learns very quickly and you will notice a difference as you put more miles on the bike.
- SAVE FILE

Step 16 - Transfer data to the ECU via the tab on the top left and you’re ready for the initial ride. While riding, ensure the oil temp stays above 80*C. Modulate the throttle starting in the lower rpm working into the midrange and higher rpm. Vary through every range and scenario you can, slow/fast acceleration and partial throttle across the ENTIRE rpm range. When you are satisfied with the map, turn off autotune. Autotune is designed to build a map and not run 24/7. If you do not plan to monitor your AFR”s with AFR_WB02_CL, remove the sensor and set aside for future use. If you do plan to monitor WB02 AFR, just be mindful for strange activity. If the bike feels great but AFR’s are all over the place it’s possible the sensor may be faulty. A sensor is a wear item, I recommend not running autotune all the time. If the sensor goes bad and tells the ECU false information, the ECU will compensate for that and screw with the tune it originally created. I have seen sensors last 10k miles, and I have seen them go bad in 200 miles.
MORE INFORMATION COMING SOON.